Showing posts with label astrophotography. Show all posts

Saturday, August 04, 2018

Print mounting

I am on vacation and finally had a bit of time to mount some of my prints, which I am going to hang in my home office. The home office is rather more important as the hospital has decided to remove our offices because there are workplaces at the operating and intensive care departments. That any doctor would have "stuff" or "papers" is apparently nonsensical. The patient data management system is digital now, and thus we do not need papers, and do not need a personal space.

Anyway, mounting prints is almost as much of a discussion point in photography as all the other things. I learnt how I do it from a Luminous Landscape tutorial, but since I mostly mount smaller prints I eschew hinging the mats, and mostly only mount with mounting corners. We will see.


First and foremost we knoll, as we learnt from Adam Savage through Tested.com. We have four prints and five sets of frames, backs and mats. So, we'll have to find a final print somewhere. When we haven't decided which prints to mount it is an idea to get symmetric mats so that we can decide which whether to use portrait or landscape orientation later. If we know which print we will mount, then slightly asymmetric mats with a thicker lower edge is often more elegant. Let's start with the elephant.


Step one is to place the print and fit the mat. An important point is that it shouldn't  move until it is fixed in place, for that purpose we use a weight. A, flat, clean and heavy weight.


With the weight in place we then place the mounting corners. Since these are small A4-size images, they will stay in place using just corners and the mat. Once the picture is securely mounted, we need to double-check that it fits the mat so that we don't find any mistakes after we mount it.


The frames are Nielsen aluminium profile frames that we put together with these simple corner fixtures consisting of a right-angle plate with two set screws and a shim to distribute the force on the aluminium. In addition there are two hanging fixtures to slide in, and fasten with set screws. For now we will leave one side unmounted to be able to get the print in.


Before sliding the mounted print in, we peel the cover off of the plexiglass and place it on the matted picture and make very sure there is no dust in between. A simple dust blower makes short work of any dirt. By now we really should have signed the mats if we wanted to do that.


In order to keep the stack of backing, print, mat and glass in place the Nielsen system uses leaf springs that you push in under the edges of the frame. I tend to use two per side for A4-size prints.


The last step is to put some hanging wire in place. By only twisting one side to start with it is easy to regulate the height when we actually hang the prints. Oh, and that's one, now for the other four, whereof one needs to be selected and printed first.

But, after all that I have more of my own art on the walls, which is nice. Thank you for following along.

Wednesday, June 29, 2016

Widefield astrophotography setup

After posting a snap of my new widefield astrophotography setup on Facebook there was a question about how it was mounted. I thought that if there is one who is interested, there are probably more people out there considering similar questions. Thus, we will take a quick look at a way to mount a widefield camera and a guide camera side-by-side on the Sky-Watcher HEQ5 german equitorial mount.
The Samyang 135mm f/2 manual telephoto lens is an excellent widefield telescope, or so the forums say. It is a super-fast 67.5mm aperture telescope at f/2. We find it mounted on my modified Canon EOS 600D with a Baader Planetarium UV/IR astrophoto filter instead of the normal IR filter. In addition we can use the brilliant clip-in narrow-band filters for H-alpha, OIII and SII to get some of the functionality of a proper astronomical CCD camera. To this we add the 50mm Orion guide scope with a StarShoot autoguider.
The autoguider is mounted on an accessory bracket with a block for mounting on photographic tripods that has a standard tripod mounting hole on the bottom. The bracket and mounting block came with the telescope. Then we can just screw the camera and guider to either side of a standard Vixen dovetail bar. Finally we mount all of that ontop of a computer-controlled Sky-Watcher HEQ5 because: Stability!

Transit of Mercury 2016-05-09

The transit of Mercury happened! Luckily I could escape a little bit early on transit day and set up the telescope to catch us a transit. We see that the gear is a fairly basic set up based on a Sky-Watcher ED80 equipped with a neutral density photographic solar filter from Baader Planetarium and a Canon D600.
Although the day was a partially it worked out well with only the smallest bit of patience. Plus, some clouds are nice to have to cool down a little bit. The mount is a Sky-Watcher HEQ5 that, although it warns us never to point the telescope at the sun everytime we turn it on, can be easily set to solar tracking speed.
In the end I got a little bit sunburned and Skrållan, my then 9-week-old boxer puppy, found a bit of shade by the photo bag.
We saw the whole picture at the top of the page with Mercury to the left and a couple of sunspots in the middle. Below we see two 100% close-up cropped frames to get a better look at the details. The difference between sunspots that are irregular and are surrounded by a lighter penumbra, and the silhouette of Mercury that is perfectly (to the limit of the camera) round and smooth is easy to see.

Saturday, June 11, 2016

Some nebulosities in Orion

Orion is one of the most spectacular parts of the sky with enormous, extended nebulas, including the brightest nebula in the northern sky. The aptly named Great nebula in Orion, often known as the Orion nebula, but we will leave that for another time and focus on two other bright and well-known nebulae.
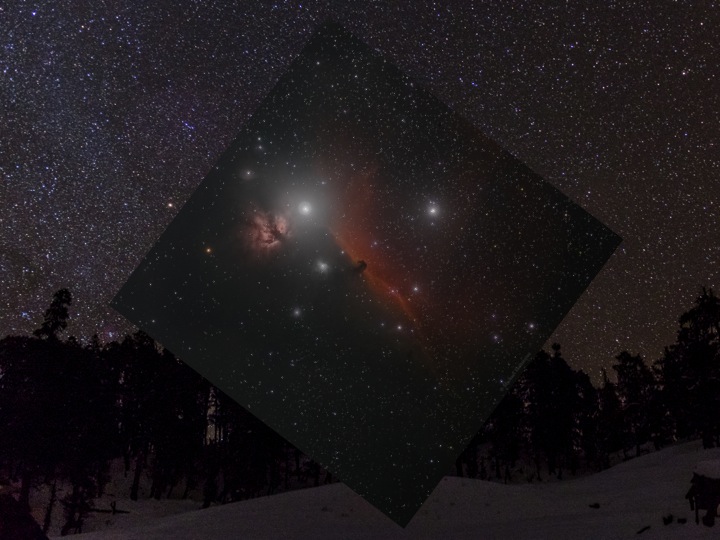
To set the scene we start with a wide field image from a true dark-sky site at 4000m in northern India. It is only a single frame with about 30s exposure. But there is so little light pollution that it is actually hard to pick out the constellations among all the stars.

Anyway, here are the major stars in Orion. As we see they have mostly old arabic names, which is where most historical knowledge of the stars come from. Admittedly, from astrology, but at least they tried.

Now we will turn our attention to two of the nebulae to have a closer look. The Flame nebula, NGC2024, and the very well-known Horsehead nebula IC434.

First we switch from an 11.5 mm aperture f2 camera lens to a proper telescope. In this case a 106 mm f5 Takahashi FSQ ED at iTelescope's observatory at Siding Spring Observatory, Australia. It is located just by the 4-meter Anglo-Australian Telescope. It gives a nice view that includes both nebulae.

Then, we can switch to the 700mm BCL telescope, named for Dame Jocelyn Bell Burnell, Annie Jump Cannon and Henrietta Swan Leavitt, which is a beast among amateur equipment. This gives us a real close-up view of the Horse Head Nebula, which is where we leave off for today.